Tutorial: Making your first app
So you've got Home Assistant going and you've been enjoying the built-in apps but you're missing this one application. Time to make your own app!
To get started with developing apps, we first need access to where Home Assistant looks for local apps. For this you can use the Samba or the SSH apps.
For Samba, once you have enabled and started it, your Home Assistant instance will show up in your local network tab and share a folder called "addons". This is the folder to store your custom apps.
If you are on macOS and the folder is not showing up automatically, go to Finder and press CMD+K then enter smb://homeassistant.local
For SSH, you will have to install it. Before you can start it, you will have to have a private/public key pair and store your public key in the app config (see docs for more info). Once started, you can SSH to Home Assistant and store your custom apps in the /addons directory.
Once you have located your app directory, it's time to get started!
Step 1: The basics
- Create a new directory called
hello_world - Inside that directory create three files:
Dockerfileconfig.yamlrun.sh
The Dockerfile file
This is the image that will be used to build your app.
FROM ghcr.io/home-assistant/base:latest

# Copy data for app
COPY run.sh /
RUN chmod a+x /run.sh

CMD [ "/run.sh" ]
The config.yaml file
This is your app configuration, which tells the Supervisor what to do and how to present your app.
For an overview of all valid app configuration options, see App configuration options.
name: "Hello world"
description: "My first real app!"
version: "1.0.0"
slug: "hello_world"
init: false
arch:
  - aarch64
  - amd64
The run.sh file
This is the script that will run when your app starts.
#!/usr/bin/with-contenv bashio

echo "Hello world!"
Make sure your editor is using UNIX-like line breaks (LF), not DOS/Windows (CRLF).
Step 2: Installing and testing your app
Now comes the fun part, time to open the Home Assistant UI and install and run your app.
- Open the Home Assistant frontend
- Go to "Settings"
- Click on "Apps"
- Click "App store" in the bottom right corner.

- On the top right three dots menu, click the "Check for updates" button
- Refresh your webpage when needed
- You should now see a new section at the top of the store called "Local apps" that lists your app!

- Click on your app to go to the app details page.
- Install your app
- Start your app
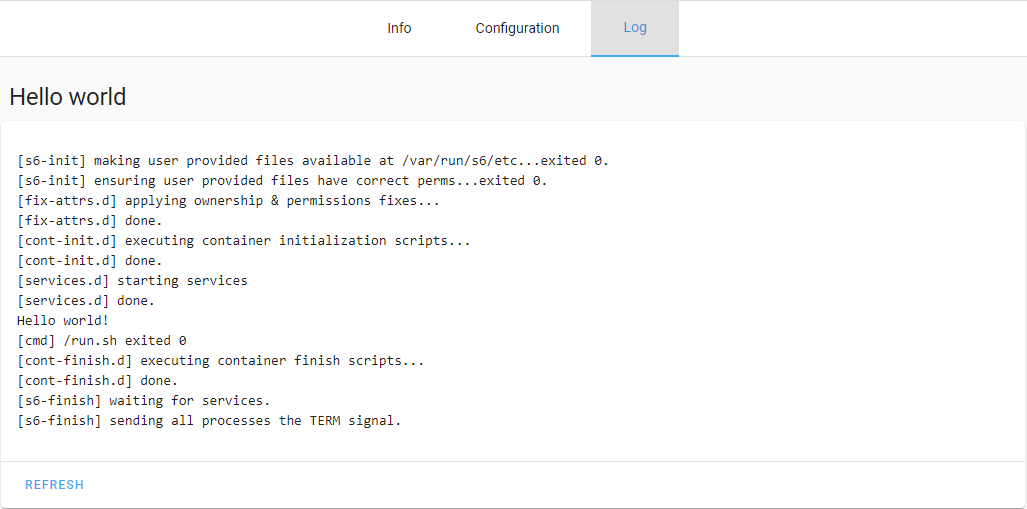
- Click on the "Logs" tab, and refresh the logs of your app, you should now see "Hello world!" in your logs.
I don't see my app?!
Oops! You clicked "Check for updates" in the store and your app didn't show up. Or maybe you just updated an option, clicked refresh and saw your app disappear.
When this happens, try refreshing your browser's cache first by pressing Ctrl + F5 (Windows/Linux) or Cmd + Shift + R (macOS). If that didn't help, it means that your config.yaml is invalid. It's either invalid YAML or one of the specified options is incorrect. To see what went wrong, go to "Settings" → "System" → "Logs" and select "Supervisor" in the top-right drop-down menu. This should bring you to a page with the logs of the supervisor. Scroll to the bottom and you should be able to find the validation error.
Once you fixed the error, go to the app store and click "Check for updates" again.
Step 3: Hosting a server
Until now we've been able to do some basic stuff, but it's not very useful yet. So let's take it one step further and host a server that we expose on a port. For this we're going to use the built-in HTTP server that comes with Python 3.
To do this, we will need to update our files as follows:
Dockerfile: Install Python 3config.yaml: Make the port from the container available on the hostrun.sh: Run the Python 3 command to start the HTTP server
Update your Dockerfile:
FROM ghcr.io/home-assistant/base:latest

# Install requirements for app
RUN \
  apk add --no-cache \
    python3

# Python 3 HTTP Server serves the current working dir
# So let's set it to our app persistent data directory.
WORKDIR /data

# Copy data for app
COPY run.sh /
RUN chmod a+x /run.sh

CMD [ "/run.sh" ]
Add "ports" to config.yaml. This will make TCP on port 8000 inside the container available on the host on port 8000.
name: "Hello world"
description: "My first real app!"
version: "1.1.0"
slug: "hello_world"
init: false
arch:
  - aarch64
  - amd64
startup: services
ports:
  8000/tcp: 8000
Update run.sh to start the Python 3 server:
#!/usr/bin/with-contenv bashio

echo "Hello world!"

python3 -m http.server 8000
Step 4: Installing the update
Since we updated the version number in our config.yaml, Home Assistant will show an update button when looking at the app details. You might have to refresh your browser or click the "Check for updates" button in the app store for it to show up. If you did not update the version number, you can also uninstall and install the app again. After installing the app again, make sure you start it.
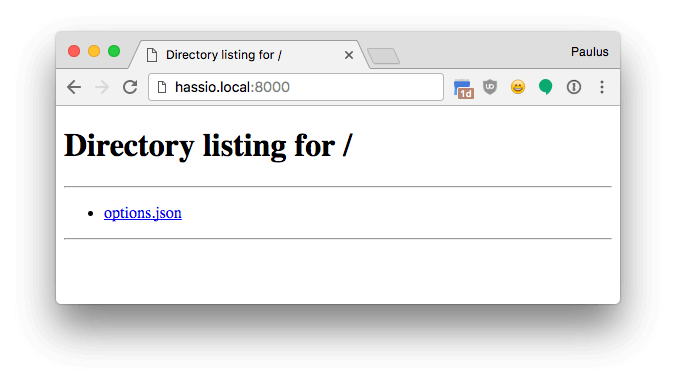
Now navigate to http://homeassistant.local:8000 to see our server in action!
Bonus: Working with app options
In the screenshot, you've probably seen that our server only served up 1 file: options.json. This file contains the user configuration for this app. Because we specified two empty objects for the options and schema keys in our config.yaml, the resulting file is currently empty.
Let's see if we can get some data into that file!
To do this, we need to specify the default options and a schema for the user to change the options. Change the options and schema entries in your config.yaml with the following:
...
options:
  beer: true
  wine: true
  liquor: false
  name: "world"
  year: 2017
schema:
  beer: bool
  wine: bool
  liquor: bool
  name: str
  year: int
...
Reload the app store and re-install your app. You will now see the options available in the app config screen. When you now go back to our Python 3 server and download options.json, you'll see the options you set. Example of how options.json can be used inside run.sh
Bonus: Template app repository
We maintain a full template example repository for apps you can use to get started. You can find that in the home-assistant/addons-example repository.