Frontend development
The Home Assistant frontend is built using web components. For more background about our technology choices, see this blog post.
Do not use development mode in production. Home Assistant uses aggressive caching to improve the mobile experience. This is disabled during development so that you do not have to restart the server in between changes.
Setting up the environment
Getting the code
The first step is to fork the frontend repository and add the upstream remote. You can place the forked repository anywhere on your system.
git clone [email protected]:YOUR_GIT_USERNAME/frontend.git
cd frontend
git remote add upstream https://github.com/home-assistant/frontend.git
Configuring Home Assistant
You will need to have an instance of Home Assistant set up. For a development instance see our guide on setting up a development environment.
There are two ways to test the frontend. You either run a development instance Home Assistant Core, or you configure the frontend to connect to an existing Home Assistant instance. The first option is how it will work in production. The second allows running a development frontend against an existing Home Assistant with minimal interference. The downside is that not everything can be tested this way. For example, the login page will always be the one built-in into your Home Assistant.
- With a dev instance of HA Core
- With a production instance of HA Core
Developing with Visual Studio Code + dev container
To configure Home Assistant to use the development mode for the frontend, update the frontend config in your configuration.yaml and set the path to the frontend repository that you cloned in the last step:
If you are using Visual Studio Code with dev containers for Home Assistant Core, you need to mount the frontend repository into the dev container. Add the following section to .devcontainer/devcontainer.json in the Home Assistant Core repository:
"mounts": [
  "source=/path/to/hass/frontend,target=/workspaces/frontend,type=bind,consistency=cached"
]
Rebuild the dev container by pressing Shift+Command+P (Mac) / Ctrl+Shift+P (Windows/Linux) to open the Command Palette, then selecting the Dev Containers: Rebuild Container command.
Edit config/configuration.yaml at the root of the Home Assistant Core repository to add this entry:
frontend:
  development_repo: /workspaces/frontend
This is the mounted path inside the dev container, see the target parameter above. If the source path is incorrect, the web frontend won't work.
Run Home Assistant Core from VS Code:
- Open the Command Palette:
- Mac:
Shift+Command+P - Windows/Linux:
Ctrl+Shift+P
- Mac:
- Select Tasks: Run Task
- Select Run Home Assistant Core
The change to .devcontainer/devcontainer.json should be excluded from any PR as it contains your local path to the frontend repository. Since the settings in .devcontainer/devcontainer.json are only processed during the container rebuild, you can safely roll back the change after the rebuild has completed.
Developing with a manual environment
If you set up the development environment for Home Assistant Core manually, fill in the frontend repository path in configuration.yaml:
frontend:
  # Example path: /home/paulus/dev/hass/frontend
  development_repo: /path/to/hass/frontend
The configuration.yaml file can be found in the config directory at the root of the Home Assistant Core repository. If the path is incorrect or otherwise inaccessible, the web frontend won't work.
If you want to connect your development frontend to an existing home assistant instance without replacing the UI completely, you will need to add the url under which your development frontend is hosted in configuration.yaml of the home assistant it will be connecting to. Like this:
http:
  cors_allowed_origins:
    - http://localhost:8124
After you've setup your frontend development environment so that you can run the script/develop script as described in section Development. You can use the following command as a replacement to develop and run the frontend on http://localhost:8124 and it will connect to the Home Assistant running on http://localhost:8123. Note that if you are running this command from a devcontainer, the url should be accessible from the container host.
script/develop_and_serve
You can change the Home Assistant url the frontend connects to by passing the -c option. This will also work for existing production core instances. It does not need to be a development version hosted locally. However, if you change the value for this option you will need to logout from your development frontend before it actually switches to the new value. For example:
script/develop_and_serve -c https://homeassistant.local:8123
You can change the port the frontend is served on by passing the -p option. Note that if you are running from a devcontainer, you will need to setup port forwarding as well if you want to access it from the container host. For example:
script/develop_and_serve -p 8654
Installing Node.js (manual environment only)
Node.js is required to build the frontend. The preferred method of installing node.js is with nvm. Install nvm using the instructions in the README, and install the correct node.js by running the following command:
nvm install
Yarn is used as the package manager for node modules. Install yarn using the instructions here.
Install development dependencies and fetch latest translations
Bootstrap the frontend development environment by installing development dependencies and downloading the latest translations.
nvm use
script/bootstrap
script/setup_translations
This needs to be done manually, even if you are using dev containers. Also, you will be asked to enter a code and authorize the script to fetch the latest translations.
Development
Run development server
Run this script to build the frontend and run a development server:
nvm use
script/develop
When the script has completed building the frontend, and Home Assistant Core has been set up correctly, the frontend will be accessible at http://localhost:8123. The server will automatically rebuild the frontend when you make changes to the source files.
Run development frontend over existing HA instance
Run this command to start the development server:
nvm use
script/develop_and_serve -c https://homeassistant.local:8123
You may need to replace "https://homeassistant.local:8123" with your local Home Assistant url.
Browser settings
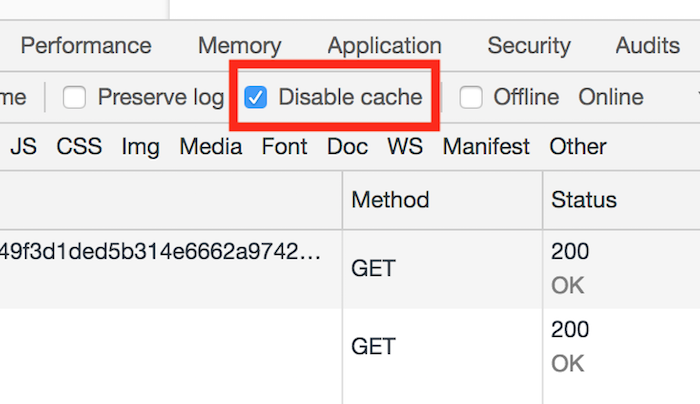
Open Google Chrome's Developer tools, and make sure you have cache disabled and correct settings to avoid stale content:
Instructions are for Google Chrome
- Disable cache by ticking the box in Network > Disable cache
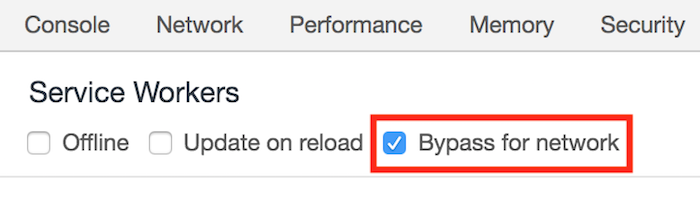
- Enable Bypass for network in Application > Service Workers > Bypass for network
Creating pull requests
If you're planning on issuing a PR back to the Home Assistant codebase you need to fork the frontend project and add your fork as a remote to the Home Assistant frontend repo.
git remote add fork <github URL to your fork>
When you've made your changes and are ready to push them change to the working directory for the frontend project and then push your changes
git add -A
git commit -m "Added new feature X"
git push -u fork HEAD
Building the frontend
If you're making changes to the way the frontend is packaged, it might be necessary to try out a new packaged build of the frontend in the main repository (instead of pointing it at the frontend repo). To do so, first build a production version of the frontend by running script/build_frontend.
To test it out inside Home Assistant, run the following command from the main Home Assistant repository:
pip3 install -e /path/to/hass/frontend/ --config-settings editable_mode=compat
hass --skip-pip-packages home-assistant-frontend