Authentication API
This page will describe the steps required for your application to authorize against and integrate with Home Assistant instances. See a demo powered by our helper lib home-assistant-js-websocket.
Each user has their own instance of Home Assistant which gives each user control over their own data. However, we also wanted to make it easy for third-party developers to create applications that allow users to integrate with Home Assistant. To achieve this, we have adopted the OAuth 2 specification combined with the OAuth 2 IndieAuth extension for generating clients.
Clients
Before you can ask the user to authorize their instance with your application, you will need a client. In traditional OAuth2, the server needs to generate a client before a user can authorize. However, as each server belongs to a user, we've adopted a slightly different approach from IndieAuth.
The client ID you need to use is the website of your application. The redirect URL has to be of the same host and port as the client ID. For example:
- client ID:
https://www.my-application.io - redirect URI:
https://www.my-application.io/hass/auth_callback
If you require a different redirect URL (such as when building a native app), you can add an HTML tag to the content of the website of your application (the client ID) with an approved redirect URL. For example, add this to your site to allow the redirect URI hass://auth:
<link rel='redirect_uri' href='hass://auth'>
Home Assistant will scan the first 10kB of a website for link tags.
Authorize
All example URLs here are shown with extra spaces and new lines for display purposes only.
The authorize URL should contain client_id and redirect_uri as query parameters.
http://your-instance.com/auth/authorize?
    client_id=https%3A%2F%2Fhass-auth-demo.glitch.me&
    redirect_uri=https%3A%2F%2Fhass-auth-demo.glitch.me%2F%3Fauth_callback%3D1
Optionally you can also include a state parameter, this will be added to the redirect URI. The state is perfect to store the instance URL that you are authenticating with. Example:
http://your-instance.com/auth/authorize?
    client_id=https%3A%2F%2Fhass-auth-demo.glitch.me&
    redirect_uri=https%3A%2F%2Fhass-auth-demo.glitch.me%2Fauth_callback&
    state=http%3A%2F%2Fhomeassistant.local%3A8123
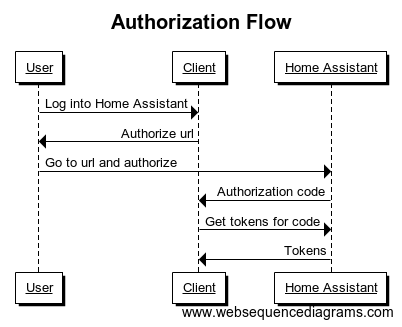
The user will navigate to this link and be presented with instructions to log in and authorize your application. Once authorized, the user will be redirected back to the passed-in redirect URI with the authorization code and state as part of the query parameters. Example:
https://hass-auth-demo.glitch.me/auth_callback?
    code=12345&
    state=http%3A%2F%2Fhomeassistant.local%3A8123
This authorization code can be exchanged for tokens by sending it to the token endpoint (see next section).
Token
The token endpoint returns tokens given valid grants. This grant is either an authorization code retrieved from the authorize endpoint or a refresh token. In the case of refresh token, the token endpoint is also capable of revoking a token.
All interactions with this endpoint need to be HTTP POST requests to http://your-instance.com/auth/token with the request body encoded in application/x-www-form-urlencoded.
Authorization code
All requests to the token endpoint need to contain the exact same client ID as was used to redirect the user to the authorize endpoint.
Use the grant type authorization_code to retrieve the tokens after a user has successfully finished the authorize step. The request body is:
grant_type=authorization_code&
code=12345&
client_id=https%3A%2F%2Fhass-auth-demo.glitch.me
The return response will be an access and refresh token:
{
    "access_token": "ABCDEFGH",
    "expires_in": 1800,
    "refresh_token": "IJKLMNOPQRST",
    "token_type": "Bearer"
}
The access token is a short-lived token that can be used to access the API. The refresh token can be used to fetch new access tokens. The expires_in value is the number of seconds that the access token is valid.
An HTTP status code of 400 will be returned if an invalid request has been issued. The HTTP status code will be 403 if a token is requested for an inactive user.
{
    "error": "invalid_request",
    "error_description": "Invalid client id",
}
Refresh token
Once you have retrieved a refresh token via the grant type authorization_code, you can use it to fetch new access tokens. The request body is:
grant_type=refresh_token&
refresh_token=IJKLMNOPQRST&
client_id=https%3A%2F%2Fhass-auth-demo.glitch.me
The return response will be an access token:
{
    "access_token": "ABCDEFGH",
    "expires_in": 1800,
    "token_type": "Bearer"
}
An HTTP status code of 400 will be returned if an invalid request has been issued.
{
    "error": "invalid_request",
    "error_description": "Invalid client id",
}
Revoking a refresh token
client_id is not required to revoke a refresh token
To revoke a refresh token, make an HTTP POST request to http://your-instance.com/auth/revoke with the request body encoded in application/x-www-form-urlencoded. Revoking a refresh token will immediately revoke the refresh token and all access tokens that it has ever granted. The request body is:
token=IJKLMNOPQRST
The request will always respond with an empty body and HTTP status 200, regardless of whether the request was successful.
Previously, revocation was performed by sending action=revoke to the token endpoint (/auth/token). This form is deprecated but still works for backwards compatibility:
token=IJKLMNOPQRST&
action=revoke
Long-lived access token
Long-lived access tokens are valid for 10 years. These are useful for integrating with third-party APIs and webhook-style integrations. Long-lived access tokens can be created using the "Long-Lived Access Tokens" section at the bottom of a user's Home Assistant profile page.
You can also generate a long-lived access token using the WebSocket command auth/long_lived_access_token, which will create a long-lived access token for the current user. The access token string is not saved in Home Assistant; you must record it in a secure place.
{
    "id": 11,
    "type": "auth/long_lived_access_token",
    "client_name": "GPS Logger",
    "lifespan": 365
}
The response includes a long-lived access token:
{
    "id": 11,
    "type": "result",
    "success": true,
    "result": "ABCDEFGH"
}
Making authenticated requests
Once you have an access token, you can make authenticated requests to the Home Assistant APIs.
For the WebSocket connection, pass the access token in the authentication message.
For HTTP requests, pass the token type and access token as the authorization header:
Authorization: Bearer ABCDEFGH
Example: cURL
curl -X GET \
  https://your.awesome.home/api/error/all \
  -H 'Authorization: Bearer ABCDEFGH'
Example: Python
import requests

url = "https://your.awesome.home/api/error/all"
headers = {
    "Authorization": "Bearer ABCDEFGH",
}
response = requests.request("GET", url, headers=headers)

print(response.text)
Example: NodeJS
fetch('https://your.awesome.home/api/error/all', {
  headers: { Authorization: 'Bearer ABCDEFGH' }
}).then(function (response) {
  if (!response.ok) {
    return Promise.reject(response);
  }
  return response.text();
}).then(function (body ) {
  console.log(body);
});
If the access token is no longer valid, you will get a response with HTTP status code 401 unauthorized. This means that you will need to refresh the token. If the refresh token doesn't work, the tokens are no longer valid and so the user is no longer logged in. You should clear the user's data and ask the user to authorize again.
Signed paths
Sometimes you want a user to make a GET request to Home Assistant to download data. In this case the normal auth system won't do, as we can't link the user to an API with the auth header attached to it. In that case, a signed path can help.
A signed path is a normal path on our server, like /api/states, but with an attached secure authentication signature. The user is able to navigate to this path and will be authorized as the access token that created the signed path. Signed paths can be created via the WebSocket connection and are meant to be short-lived. The default expiration is 30 seconds.
There are two ways to get a signed path.
If you are creating an integration, import async_sign_path from homeassistant.components.http.auth. The method will automatically adopt a refresh token if called from inside the context of an HTTP request or a WebSocket connection. If neither is available (for example, because it is inside an automation), it will use a special "Home Assistant Content" user.
If you're working with the frontend, you can create a signed path using the following WebSocket command:
{
  "type": "auth/sign_path",
  "path": "/api/states",
  // optional, expiration time in seconds. Defaults to 30 seconds
  "expires": 20
}
The response will contain the signed path:
{
  "path": "/api/states?authSig=ABCDEFGH"
}
Some things to note about a signed path:
- If the refresh token is deleted, the signed URL is no longer valid.
- If the user is deleted, the signed URL is no longer valid (because the refresh token will be deleted).
- If Home Assistant is restarted, the signed URL is no longer valid.
- Access is only validated when the request is received. If a response takes longer than the expiration time (for example, downloading a large file), the download will continue after the expiration date has passed.